
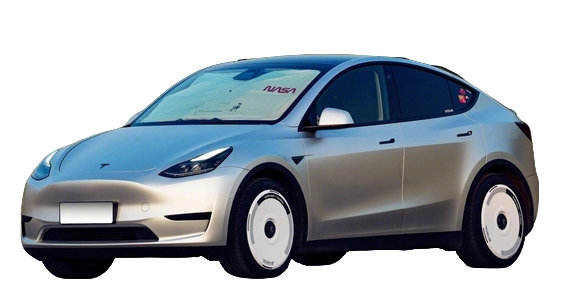
Removing Tesla aero wheel covers is one of the first upgrades many owners attempt. Whether you want to inspect the rim, swap to aftermarket Tesla wheel covers, or simply clean behind the hub, knowing the correct removal technique prevents scratches and broken clips. In this guide, we will walk you through the safest way to remove Tesla aero wheel covers from Model 3 and Model Y in under five minutes.
Why Tesla Owners Remove Aero Wheel Covers
Tesla ships the Model 3 and Model Y with lightweight aero wheel covers designed to improve efficiency and range. While functional, many drivers prefer the look of exposed alloy rims or want to install custom Tesla wheel covers that match their style. Others remove the covers to clean brake dust buildup or to inspect for curb damage before installing protective aftermarket options.
Understanding why you want to remove Tesla aero wheel covers helps you choose the right replacement. If protection is your goal, browse our full collection of Tesla wheel covers engineered for fit and durability.
Tools You Need to Remove Tesla Aero Wheel Covers
The good news is that you do not need a full garage setup. Here is what we recommend:
- Plastic pry tool or flat trim remover — prevents metal-to-metal contact that scratches paint.
- Soft microfiber towel — lay it on the ground to protect the cover once removed.
- Flashlight or phone light — helps you locate the release clips in low light.
- Gloves — optional, but useful for grip and cleanliness.
We strongly advise against using metal screwdrivers. The sharp edges can gouge the alloy rim or crack the plastic retaining clips on the aero cover itself.
Step-by-Step: How to Remove Tesla Aero Wheel Covers
Step 1 — Park on a flat surface and engage the parking brake
Safety comes first. Park your Tesla on level ground, turn off the vehicle, and engage the parking brake. If you have a jack, you can lift the wheel slightly for easier access, but it is not required for cover removal.
Step 2 — Locate the retention clips
Each Tesla aero wheel cover attaches with a ring of spring-loaded plastic clips around the inner edge. Look between the cover and the rim at the 3 o’clock and 9 o’clock positions. You should see small gaps where the cover meets the wheel.
Step 3 — Insert the pry tool gently
Slide the flat edge of your plastic pry tool into the gap. Apply slow, even pressure toward the center of the wheel. You will feel resistance as the clips release. Work your way around the perimeter, releasing two to three clips at a time.
Step 4 — Pull the cover straight off
Once most clips are loose, grip the cover with both hands and pull it straight toward you. Do not twist or rock it side to side, as this can bend the remaining clips. Set the cover on your microfiber towel immediately.
Step 5 — Inspect and clean
With the cover removed, inspect the alloy rim for brake dust, scratches, or corrosion. Clean the surface with a gentle wheel cleaner before installing new Tesla wheel covers or reinstalling the aero covers.
Common Mistakes When You Remove Tesla Aero Wheel Covers
Even a simple job can go wrong. Here are the most common errors we see:
- Using metal tools — scratches rims and weakens clips.
- Prying at one point only — concentrates stress and cracks the cover.
- Forcing the cover sideways — bends the retention ring and causes rattling later.
- Ignoring temperature — cold plastic becomes brittle; warm the covers slightly in winter before removal.
If you plan to upgrade rather than reinstall, check out our DIY Custom Wheel Covers for a personalized fit and finish.
What to Do After You Remove Tesla Aero Wheel Covers
Once the covers are off, you have three main paths:
- Reinstall the aero covers — align the valve stem cutout and press firmly until all clips click.
- Run bare rims — clean and protect the alloy with a ceramic wheel coating.
- Install aftermarket Tesla wheel covers — choose from snap-on, bolt-on, or full-wrap styles.
Aftermarket covers often offer better scratch resistance and visual impact than the factory aero design. For performance-oriented drivers, our Power Turbine Wheel Cover delivers an aggressive motorsport look with OEM-grade fitment.
FAQ: Remove Tesla Aero Wheel Covers
Will removing aero wheel covers void my Tesla warranty?
No. Removing or replacing wheel covers does not affect your Tesla vehicle warranty. The covers are cosmetic accessories, not structural or safety components. Just avoid damaging the rim or lug nuts during the process.
Do I lose range if I remove Tesla aero wheel covers?
Tests by owners and third-party reviewers show a minor efficiency drop of roughly 2–4 percent at highway speeds. Around town, the difference is negligible. If range is critical, reinstall the aero covers for long trips and swap to style covers for daily driving.
Conclusion
Knowing how to remove Tesla aero wheel covers safely saves time, protects your rims, and opens the door to customization. With a plastic pry tool, gentle pressure, and the steps above, you can complete the job in five minutes without a single scratch. Ready to upgrade? Visit Nauticrim and explore Tesla wheel covers built for Model 3 and Model Y owners who demand both style and protection.
You may also like: Once the factory aero covers are off, the Ink Blossom and Rainbow Halo covers click straight onto the stock rims.